Monday, April 16, 2018

Some more HOf layout videos

To be honest there's more HOf video out there on YouTube than I thought. Here's a few more I found.
I like this first one because the Feldbahn train really does seem to have a purposeful end to end journey.

This next one became an instant favorite from the moment I watched it. Delightful detail. A very realistic atmosphere. Almost perfect for a slate mine.

This third one caught my attention because with the model being surrounded by walls on all sides, it's like the model could be stored in a drawer....

Finally, an amusing oddity. Someone has created a Draisine in HOf using a Busch Mechanism and a model of a UAZ van. Very likeable.

Sunday, April 15, 2018

Some HOf layout video

I've been perusing YouTube looking for some Busch HOf videos to see what people are doing. Naturally being a German product, most of the videos are German so I can't understand a thing. I did find a couple of "How I built my layout" videos. This first one is all in one film.

This second one is the first in a series that seems to run up to seven films. All covering different aspects of the construction. The work showing the construction of the mine is enlightening. Some very interesting behind the scenes views.
Finally for tonight, a couple short films of Peter Smiths "Oresome Aggregates"


Saturday, April 14, 2018

Planning fun.

It's an incredible winter/spring storm here in Minnesota. Roads are closed. No travel is advised until tomorrow morning. As a result, I've spent the afternoon messing around with track planning templates to come up with a layout for the baseboard. It doesn't always go as planned, you get to the last track section and it doesn't quite line up. So, just for fun. Here's a few pictures to show that planning with templates doesn't always work out...


(all these pictures are closeups of the final track joins of some track plans)

Wednesday, April 11, 2018

Coupling up

Someone had asked me about the coupling system used to couple the wagons to the locomotive. 
My efforts hadn't come out too clearly on the video. So, I put a macro lens on my iPhone and despite the dubious quality of the $5 lens I managed to get some close ups that I hope will clear things up.
There are many different types of couplings used to assemble trains on prototype narrow gauge systems revolving around hooks, chains rods, bars, and probably even rope. 
Busch seems to have gone for a representation of a three link chain (feldbahn experts can correct me). One end of the wagon has a pin, and the other end of the wagon, this tiny etched chain link thing. The buffer beam of the locomotive has a pin on it, and to couple the wagon to the locomotive you just slide the link over the pin. It's as easy as that.

1. The link on peat wagon

2. The pin on the locomotive. I expect it's very, very over long.
You can also see a Neodymuim magnet under that. 
3. The link is over the pin the wagon is coupled.
I'm not sure if it's fair to say. "It's as easy as that" for the coupling. There's certainly a knack to it, and a magnifier is certainly going to help. But there are people in the finescale railway modeling fraternity who positively enjoy coupling wagons together using scale three link couplings (that would be me then). The pin on this locomotive looks a bit on the high side to slide the link over using a tiny hook. But I will have a closer look at that, and report back. I'll need to find one of my coupling hooks first. But that's a story for another post in the future.
So that's the basics on the coupling system. Then again, there's that Neodymium magnet on the loco buffer beam, and that's another story too.

Monday, April 9, 2018

Some thoughts about track planning. (1)

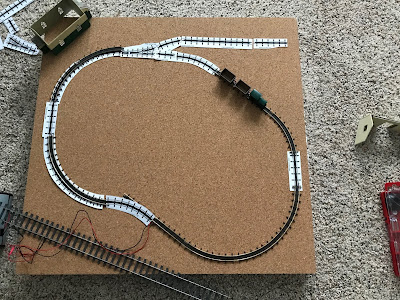
One nice thing about all the catalogues and papers I received in the Feldbahn set box was that one page in the catalogue had actual size pictures of the track elements on it. So, to aid in the planning of the model I copied the page a few times and cut out the track pieces and played with them to see what kind of layout I could come up with. As there is no flexible track in the Feldbahn system, that limits you to what can be done. 

Track elements copied.
Here's a few ideas I developed as I moved the track elements about. I want to keep it simple as a move 'beyond the train set", and creating a series of believable vignettes of minimum Gauge railways as a part of the layout.
I like the idea of featuring a siding with a standard gauge wagon on it to compare sizes of the standard and minimum gauge stock. I think an offstage exit to a storage yard, that could also double as a siding is a good idea too.

1. Adding some straights into the oval is the first basic step. Then a turnout for a siding or
offstage exit.

2. How about a triangular layout? I had hopes for this idea
but on reflection, It's my least favourite concept.

3.  I like the idea of watching a train meander down an S curve.
The whole left hand side is a meandering curve, though the Sand Hutton didn't
really feature any meandering sections of track. Quite pleasant.

4.  A little less meandering curve, and a lot of space in the bottom left. Should I
put scenery there or would that be better served by having track there?

5. So far this seems to be the best option. This uses up the space well. A nice length of curvy
section and a straight to put a small station platform on, and the offstage exit/siding.


A few first steps in planning then. Bear in mind that planing is a personal thing and you may disagree with what I'm doing, and the way I'm doing it. That's your right, but I won't listen to your opinions.
While I'm placing and moving track elements about on the board, I'm looking at pictures and seeing things in my minds eye and trying to imagine how they'd look translated to this small board. Right now, numbers 3 and 5 fit my visions best. After a bit more fettling and messing about I might come up with something I'm happy with. Or I might come up with something totally different.

Sunday, April 8, 2018

First thoughts on video.


Here we are then, a first look at, and some first thoughts on, this Busch Feldbahn set as I take a look at it. 
Apologies for the pronunciation of Gmeinder, (correct pronunciation advice much appreciated)
You will also notice that I have issues going between English and American terminologies and mixing 3.5 and 4mm scales.  

Here we go

I did think of entitling this post with more than one "Here we go" to acknowledge my beloved Lincoln City FC's victory in the Checkatrade trophy final at Wembley stadium today but I thought better of it.

I spent Saturday exhibiting my new HO scale layout at the Granite city train show yesterday. It was a very trying affair with all kinds of problems I've never experienced before. So when we arrived home I was feeling pretty jaded. That was until I went down to the post office and opened our PO Box to find a large box from Germany there. I immediately perked up. This was the Busch Feldbahn set arrived 4 a whole days earlier than predicted! I rushed home and opened the package up
Nicely presented in the box on its arrival.
 A very nice, cleanly laid out package. The assembly instructions were printed in three languages, including English, so there were no problems in assembling things. Not that instructions were needed to put track together and wire things up.
The set sits on the approx. 19" square board made for it.
As you can see, the starter set sits very comfortably on its baseboard with plenty of room for me to expand the oval, maybe add a point and a siding, perhaps a passing loop. I'm excited to see how I can fit things on the board and develop it.
Yes, it's small
The Gmeinder locomotive is a nice looker, and yes it is quite small. Perhaps it's a tad bigger than I expected, like I said. I had no idea what the physical size of these items was.
Anyway, I'm quite impressed by the quality of the model and the detail. I'm now going to spend some time watching the train run around in circles to get a feel for it.

Thursday, April 5, 2018

A late Birthday present

It was my birthday a couple of weeks ago, and much to my surprise, a late present just turned up from my wife. This book. The third edition of Ken Hartley and Paul Ingham's book on the Sand Hutton Light Railway.
Happy Birthday to me.
The first edition of the Ken Hartley book, published in 1962 by the NGRS still resides in my collection, a small thin paperback.
I also had a copy of the 2nd edition from 1982. A somewhat bigger book than the first. It got lost when I emigrated to the USA some 20 years ago. Both books are a far cry from this magnificent tome. Hard backed, and in full colour with superbly reproduced photographs, drawings, and maps. A treat to look at.
Though I call myself a fan of the work of Sir Arthur Heywood. It's very probably more the work of Sir Robert Walker and the Sand Hutton that has inspired my layouts.
There was one particular image in previous editions of the book of the freight terminus at Claxton that had a huge influence on a previous Gn15 layout of mine. I built a model of the goods shed based on the end view in this picture. The barn I used for my working crane feature appears in the background of this image.
Finally, the caption of the photograph says it all. "Claxton terminus, abutting on Whinny Lane". Just seeing that name in print makes me nostalgic for that old layout of mine. Much of that model was inspired by just that one picture.

That image is in this book, and reprinted with such clarity I feel like I'm looking at it for the first time. There are many inspirational images in this book. Pictures that are familiar to me from the first books and others that I have never seen before. There's one of a short train leaving the yard at Warthill station and crossing a road that just screams out. "Model me!"
It's going to be very difficult to resist some of these cries from the pictures, I can tell you.


Wednesday, April 4, 2018

Let's make the baseboard!

I don't have the trains yet, and I don't know what to do with them when I get them. But I know the location and size. That was laid down in the challenge, and I have the materials to hand, so I can build the baseboard.
As I stated in the previous post, my inability as a woodworker is near legendary, so being able to use materials that I can cut with a knife and then glue, rather than cutting with a saw, followed by nailing or gluing and screwing is great for me. In fact, I'd go so far as to say that I might have given up model railways if I couldn't have found an alternative to wood for baseboards.
Here then is an outline of the process.
1. The Materials. The cork faced sheet, a plain sheet of 3/16" (5mm) foamcore for the frame and any bracing I might deem necessary. A big 24" (610mm) square. A knife with nice, new, sharp blades, and finally a good strong glue. My glue of choice is Elmers woodworking glue, a strong PVA adhesive.
Everything I shall use to make the baseboard.
2. Cutting up. I cut the cork board slightly smaller than the drawer size so it would be easy to remove, and replace, just in case. Then using the 3/16" board I cut some 1 1/2" (38mm) strips for the edges. A totally arbitrary distance of no significance whatsoever.
All the bits cut. (Feel free to make shadow puppet remarks)
3. A sticky business. I take the glue, stick the parts together, and weigh them down for however long I see fit. (A good couple of hours)
Plenty of heavy tiles to weigh down the board as the glue sets.
4. Et voilĂ ! We are finished. Square and level and a good fit in the drawer.
A nice fit. 
5. An afterthought. Even though the board is solid with no twisting or warping possible, some bracing underneath would probably not go amiss. Then I thought about all that empty space under there. Perhaps there will be room in that void for stock boxes, tools, controller, and the like. That bracing could then be used to partition areas off. Something for me to investigate when the trains get here.

Tempting storage space.
6. In conclusion. Quick, simple and easy. A strong baseboard for a micro layout.